Front post stitches, bobbles, cables, and diamonds worked side by side in one luxurious throw that looks like it came from an Irish knitwear shop.
The Blanket That Looks Impossible Until You Actually Start It
I have to be honest with you. This blanket sat in my ideas folder for a long time before I finally committed to it.
Every time I came across one of those gorgeous Irish cable knit throws — the deeply textured panels sitting side by side, each one doing something slightly different — I would think: I want to crochet that. And then I would quietly talk myself out of it and move on to something easier.
If that sounds familiar, stay with me. This blanket is not as intimidating as it looks. It uses front post stitches, bobbles, cable crossings, and diamond textures, but here is the thing about working a blanket in vertical panels: you are never doing all of those things at once. You are doing one thing at a time, finishing each panel before moving to the next, and by the time you reach the far side of the blanket the early panels have become second nature.
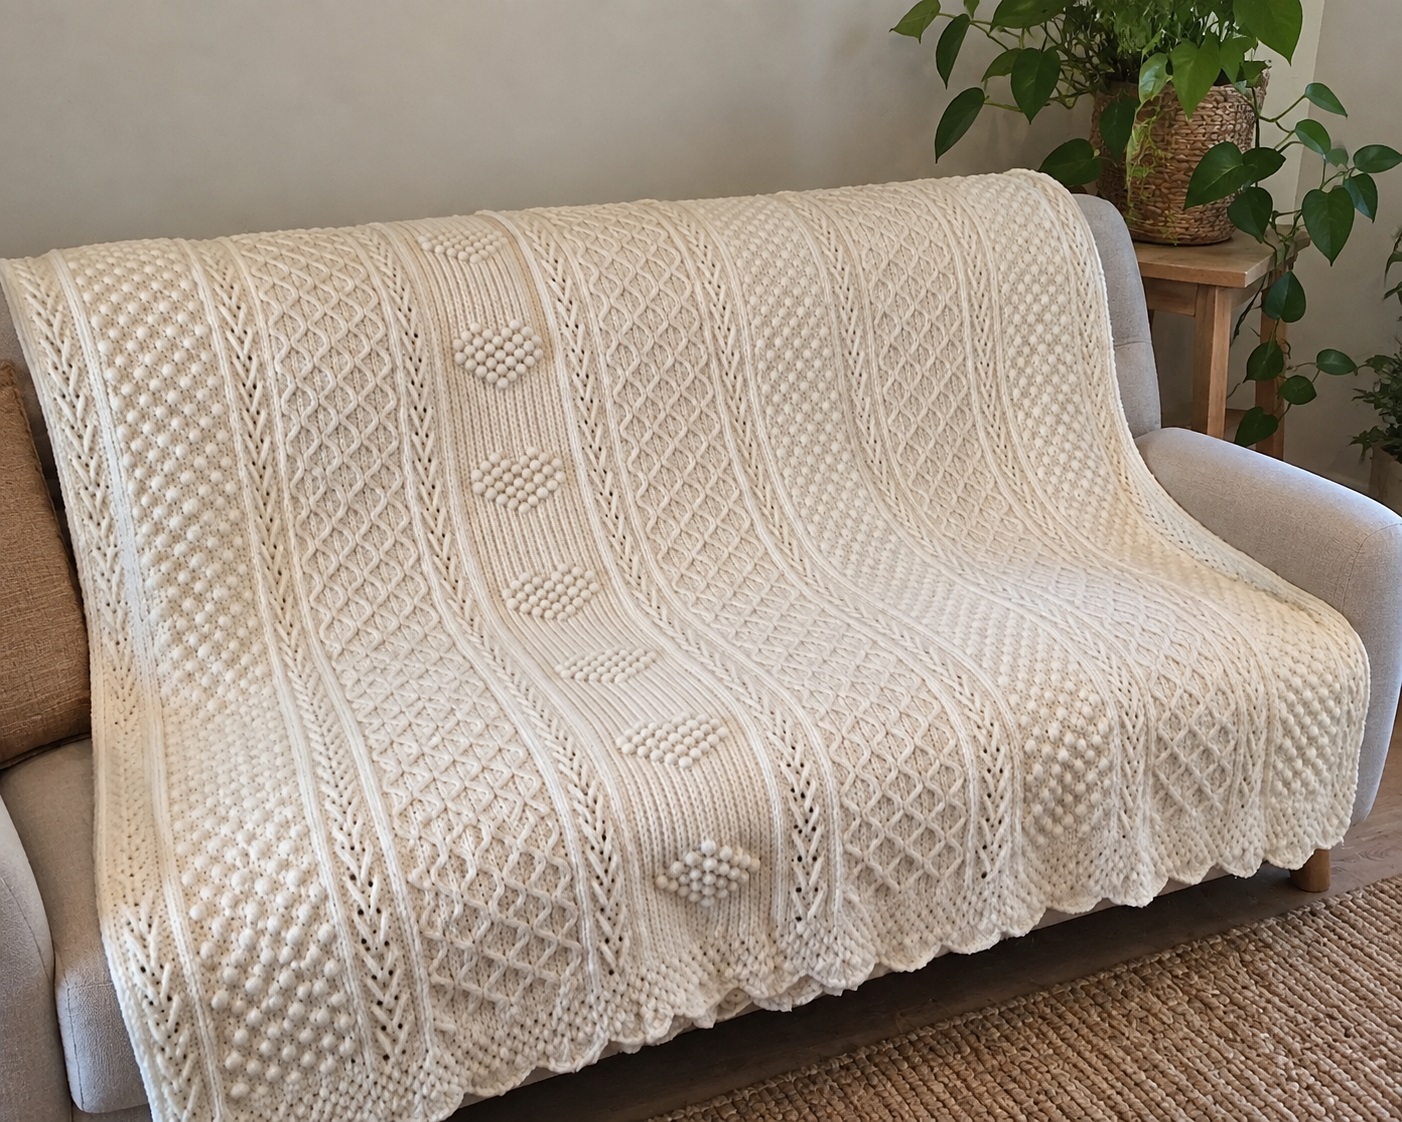
The result is a throw that makes people stop when they walk into a room and ask where you bought it. And you get to tell them you made it yourself.
At a Glance
| Detail | Specification |
|---|---|
| Finished Size | 50 x 70 inches (127 x 178 cm) |
| Skill Level | Intermediate to Advanced |
| Yarn Weight | Worsted (#4) |
| Hook Size | 5.5 mm (US I/9) |
| Yardage | 2,500 to 3,000 yards |
Materials
Worsted weight yarn, 2,500 to 3,000 yards. Choose a smooth yarn with good stitch definition — the texture only reads as clearly as the yarn allows it to. Cream, oatmeal, and warm white show every post stitch and bobble beautifully. Deep jewel tones and heathered greys work equally well. Avoid anything fluffy or halo-heavy, because the surface texture will simply disappear into the fiber.
You will also need a 5.5 mm hook, stitch markers, a yarn needle, scissors, and a measuring tape.
Abbreviations
ch — chain | sl st — slip stitch | sc — single crochet | hdc — half double crochet | dc — double crochet | FPdc — front post double crochet | BPdc — back post double crochet | tr — treble crochet | bobble — 5 dc bobble | sk — skip | st — stitch | rep — repeat
If you have not worked post stitches before, spend ten minutes with a practice swatch first. Insert your hook around the vertical post of the stitch below rather than through the top loops. That single technique is responsible for almost all of the texture in this blanket.
Foundation
Chain 180 stitches, or any multiple that allows all nine panels to fit evenly at your gauge. Work one foundation row of single crochet across. Place stitch markers at every panel boundary before beginning Row 1 and move them up as you work. Losing track of panel boundaries mid-row is the most common frustration in a blanket like this, and markers cost you nothing.
Panel Layout — Left to Right
Panel 1 — Seed Stitch
Panel 2 — Small Cable
Panel 3 — Diamond Texture
Panel 4 — Ribbed Bobble
Panel 5 — Diamond Texture
Panel 6 — Waffle Texture
Panel 7 — Twisted Cable
Panel 8 — Diamond Texture
Panel 9 — Seed Stitch
Each panel runs vertically from the foundation to the top of the blanket. As you work across each row, you simply switch stitch patterns at each marker. The layout is mirrored, so by the time you reach the right side of the blanket, you have already worked those same stitches on the left.
The Panels
Panel 1 and Panel 9 — Seed Stitch
Row 1: Sc, dc, sc, dc across. Row 2: Work each stitch into the opposite stitch type from the row below. Repeat for the full length of the blanket. These outer panels frame the textured interior and give your eye a place to rest at each edge.
Panel 2 — Small Cable
Work several foundation rows of alternating FPdc and BPdc to build the ribbed structure. Every 8th row, cross two FPdc over the next two FPdc to create a cable twist: skip the next two stitches, work FPdc around each of the two stitches after them, then go back and work FPdc around each of the two skipped stitches. Repeat the crossing every eighth row for the full length.
Panel 3, Panel 5, and Panel 8 — Diamond Texture
Row 1: Alternate FPdc and BPdc across the panel. Rows 2 through 6: Shift the post stitches one position on each row to create diagonal movement. Continue shifting until the diagonals converge and diamond shapes appear. Repeat the full sequence from Row 1. The shift is subtle — just one stitch per row — so pause every few rows to confirm the lines are tracking correctly.
Panel 4 — Ribbed Bobble
This is my personal favorite panel. Work FPdc around every stitch for six rows to build dense vertical ribbing. On the bobble row, work 10 FPdc, place one bobble, work 10 FPdc, place one bobble, and continue across. On the next bobble row, offset each bobble so it falls between the bobbles of the previous repeat rather than directly above them. The staggered result looks far more complex than it actually is.
To work a bobble: yarn over, insert hook, pull up a loop, yarn over, pull through two loops — five times into the same stitch. Yarn over and pull through all six loops. Chain 1 to close.
Panel 6 — Waffle Texture
Row 1: Double crochet across. Row 2: FPdc around every other stitch, dc in the stitches between. Row 3: FPdc around the stitches that had dc in the previous row, dc around those that had FPdc. Repeat Rows 2 and 3. The alternating post stitch placement builds up into a regular raised grid that sits quietly beside the more dramatic panels around it.
Panel 7 — Twisted Cable
Establish six raised FPdc stitches in a vertical column at the center of this panel. Every 10 rows, cross the outer three stitches over the center three: slip the first three FPdc onto a stitch marker, work FPdc around each of the next three stitches, then work FPdc around each of the three held stitches. The twist builds row by row into a bold central cable that anchors the whole blanket visually. Repeat the crossing every tenth row.
Border
Once the blanket body reaches your desired length, work the border in rounds around the entire perimeter.
Round 1: Work one round of sc evenly around all four edges, placing 3 sc in each corner. Round 2: Work (sc, ch 1, skip 1) around for a simple lace edge. Round 3: Work sc in every stitch around, including into each ch-1 space from Round 2. Repeat Rounds 2 and 3 until the border measures approximately 2 inches wide. Fasten off.
Finishing
Weave in all ends, running each tail in two directions through the fabric. Wash gently according to your yarn’s care instructions. Lay flat and block to the finished dimensions, smoothing each panel and easing the border into shape. Allow to dry completely before use.
Blocking makes a genuine difference to this blanket. The post stitches open slightly, the diamonds sharpen, and the whole surface settles into an evenness that is hard to achieve straight off the hook. It is worth every hour the drying takes.
Final Thoughts
This blanket takes time. There is no version of a richly textured cable throw that does not. But it is the kind of time that feels well spent — each panel revealing itself row by row, the whole composition slowly becoming something you are genuinely proud of.
When it is finished and blocked and folded over the arm of a chair, it will look like something that cost a great deal of money and took a great deal of skill. It did take skill. Your skill. And that is the part that makes every row worth it.