Crochet Baby Blanket with Arches — Free Pattern
A soft, delicate baby blanket with just enough detail to make it feel special — and just enough repetition to keep you relaxed while making it.
The Blanket That Looks Delicate Without Being Difficult
There is something quietly beautiful about a baby blanket that has texture without heaviness, detail without complexity, and a handmade quality that no store-bought alternative can replicate.
This Crochet Baby Blanket with Arches delivers all three. The alternating rows of solid double crochet and open arch sections create a lightly lacy effect that looks far more intricate than it actually is. Once you have worked through the first repeat, the pattern becomes intuitive — the kind of making where your hands find their rhythm and your mind finally gets to rest.
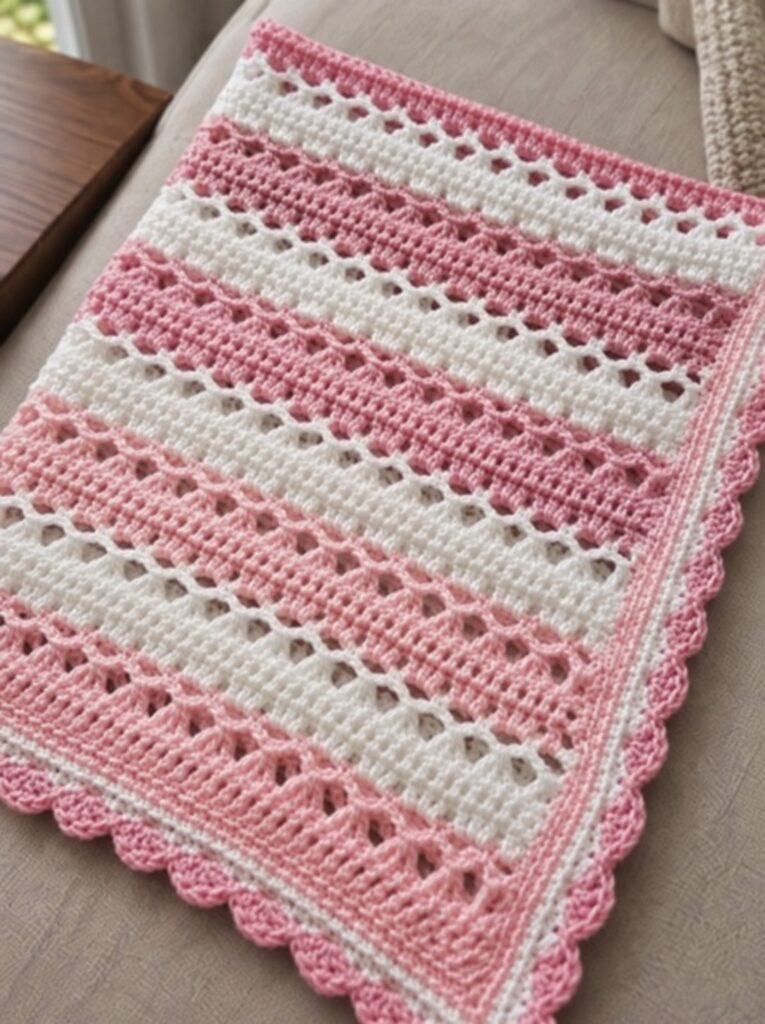
It works beautifully in a single color, but it truly comes alive in two. Soft blue and cream, blush pink and white, sage green and beige — the same blanket takes on an entirely different personality with each color combination you choose. You could make this pattern ten times and never make the same blanket twice.
The complete pattern is written out in full below.
At a Glance
| Detail | Specification |
|---|---|
| Finished Size | Approximately 60 cm wide x 70 cm long |
| Difficulty | Beginner — Easy Intermediate |
| Hook Size | 3.0 mm |
| Yarn Weight | Lightweight baby yarn |
| Total Yarn | Approximately 400 g |
| Main Color | Approximately 300 g |
| Contrasting Color | Approximately 100 g |
Materials
- Soft lightweight baby yarn — approximately 300 g in main color (MC) and 100 g in contrasting color (CC)
- 3.0 mm crochet hook
- Yarn needle
- Scissors
The original tutorial uses two-color combinations such as blue and cream or pink and white. Any soft, lightweight baby yarn works well for this project. Choose something with a smooth finish so the arch sections read clearly in the finished fabric.
Abbreviations
| Abbreviation | Meaning |
|---|---|
| ch | chain |
| ch-sp | chain space |
| sc | single crochet |
| dc | double crochet |
| dc2tog | double crochet 2 together |
| dc3tog | double crochet 3 together |
| st(s) | stitch(es) |
| MC | main color |
| CC | contrasting color |
Pattern Notes
- The foundation chain is worked in a multiple of 3 + 1. This blanket begins with 130 chains.
- Color changes are made at the end of the indicated row by completing the final yarn over with the new color before turning.
- Rather than cutting the unused color after every change, carry it neatly up the side of the work until it is needed again. This keeps your end count low and your finishing time short.
- The main stitch pattern repeats until the blanket reaches your desired length.
- The arch sections open most clearly after a light blocking at the end.
Understanding the Stitch Pattern
Before beginning, it helps to understand how the four-row sequence builds the arch effect:
Cluster Row: Double crochet stitches are worked together into groups of two and three, creating the gathered sections between the arches.
Arch Row: Chain spaces are worked between the clusters, forming the open arched sections visible across the blanket.
3-dc Group Row: Three double crochets are worked into each chain space, filling in the arches and building the fabric back up to full width.
Solid dc Row: A straightforward row of double crochet worked across all stitches, creating the solid band between each arch repeat.
These four rows worked together produce one complete arch repeat. The blanket is simply a repetition of this sequence from foundation to final row.
The Pattern
Foundation Chain
With MC, chain 130.
Row 1
Double crochet in the 4th chain from hook and in each chain across. Turn.
— 127 double crochets.
Row 2 — Cluster Row
Chain 2. Double crochet in next stitch, completing the beginning edge as a dc2tog.
Chain 4. Dc3tog over next 3 stitches.
Repeat from * to * until 2 stitches remain.
Chain 4. Dc2tog over final 2 stitches. Turn.
— 43 clusters separated by 42 ch-4 spaces.
Row 3 — Arch Row
Chain 4. (The first 3 chains count as 1 dc and the remaining chain creates the first ch-1 space.)
Single crochet in first ch-4 space.
Chain 4. Single crochet in next ch-4 space.
Repeat from * to * across all remaining ch-4 spaces.
Chain 1. Double crochet in final edge stitch. Turn.
— 41 ch-4 spaces with a ch-1 space at each edge.
Row 4 — 3-dc Group Row
Change to CC while completing the final double crochet of Row 3.
Chain 3, turn. (Ch-3 counts as first dc.)
Double crochet in first ch-1 space.
Work 3 double crochets in each ch-4 space across.
Double crochet in final ch-1 space. Double crochet in 3rd chain of the beginning ch-4 from the previous row. Turn.
— 127 double crochets.
Row 5 — Solid dc Row
Chain 3, turn. (Ch-3 counts as first dc.)
Double crochet in each remaining stitch across.
Change back to MC while completing the final double crochet. Turn.
— 127 double crochets.
Rows 6 through 9
Row 6: Repeat Row 2.
Row 7: Repeat Row 3.
Row 8: Repeat Row 4, changing to CC as established.
Row 9: Repeat Row 5, changing back to MC in the final stitch.
Pattern Repeat
Continue repeating Rows 2 through 9 until the blanket measures approximately 70 cm long, or your preferred length.
The sequence runs as follows:
| Row Type | Color |
|---|---|
| Cluster Row | MC |
| Arch Row | MC |
| 3-dc Group Row | CC |
| Solid dc Row | CC → change to MC |
| Repeat | — |
End on a completed solid dc row for the neatest finish.
Color Change Method
For a clean, seamless color change at the end of a row:
- Work the final stitch of the row with the current color up to the last yarn over.
- Drop the current color and pull the new color through the remaining loops on the hook.
- Continue with the new color on the following row.
To minimize ends, do not cut the unused color. Simply carry it up the side edge of the work, laying it along the top of the edge stitch as you turn, and pick it back up when needed. This technique is especially efficient in a pattern with regular, predictable color changes like this one.
Finishing
When the blanket reaches your desired length, fasten off both colors securely.
Weave in all remaining ends with a yarn needle, running each tail in two directions through the fabric to keep ends secure through washing.
Block the finished blanket gently to help the arch sections open evenly and give the edges a cleaner, more defined shape. For acrylic or acrylic blend yarn, a light steam block or a press under a damp cloth works well. For natural fiber yarn, wet blocking will give the most defined result.
Tips for Working This Pattern
On reading the arch rows: The chain-4 spaces in the arch row are your landmarks. Every single crochet sits inside a chain-4 space, and every chain-4 connects one single crochet to the next. If you can see those spaces clearly as you work, you will never lose your place.
On carrying yarn: Keep the carried strand at a consistent tension as you work each row. Too tight and the side edges will pull inward. Too loose and loops will appear along the edge. A steady, even tension produces a side edge that disappears cleanly when the blanket is blocked.
On color choices: High contrast combinations — deep teal and cream, navy and white — make the arch texture stand out dramatically. Soft tonal combinations — blush and ivory, sage and oat — give the blanket a quieter, more delicate appearance. Both work beautifully. Choose based on the aesthetic of the nursery you are making it for.
On length: The pattern repeat is eight rows. For the most balanced finish, end on a completed Row 5 or Row 9 — both are solid double crochet rows that give the blanket a clean, even final edge.
Final Thoughts
This is exactly the kind of pattern that earns a permanent place in a crocheter’s rotation — interesting enough to hold your attention, repetitive enough to let you relax, and beautiful enough to give as a gift with genuine pride.
The arch stitch is approachable for anyone who is comfortable with basic stitches and ready to try something slightly more decorative. And for experienced crocheters, it offers the particular satisfaction of a pattern that looks like more work than it was.
Make it in blue and cream for a classic nursery. Make it in blush and white for something softer. Make it in bright yellow and grey for something more modern. However you make it, someone is going to ask you where you bought it.