Gentle waves meet raised puff stitches in one of the most satisfying textured stitches you will ever learn — and it is much easier than it looks.
The Stitch That Makes You Want to Keep Going
There are crochet stitches you learn once and use occasionally. And then there are stitches that become a permanent part of how you crochet — the ones you reach for when you want something beautiful without something complicated.
The Puff Ripple Stitch is firmly in the second category.
It combines two things that work together almost perfectly: the gentle, flowing movement of a classic ripple stitch and the soft raised texture of puff stitches sitting along every peak. The result is a fabric that has both movement and dimension — waves rolling across the surface with little raised details punctuating every crest. It looks like the kind of stitch that takes years to master. It does not.
Once you understand where the valleys sit, where the double crochet sections belong, and where the puff pairs are placed, the repeat becomes genuinely easy to follow. After a few rows you will find yourself reading the fabric rather than the written instructions — and that is the moment crochet stops feeling like work and starts feeling like something else entirely.
This article includes the complete pattern, full troubleshooting guidance, sizing information, and everything you need to work this stitch confidently from your first chain to your finished project.
What Can You Make With the Puff Ripple Stitch
This stitch is more versatile than it might initially appear. The combination of texture and movement works beautifully across a wide range of projects including baby blankets, crochet throws, scarves, shawls, cushion covers, bed runners, lap blankets, and decorative crochet panels. For any project larger than a small swatch, making a tension swatch first is strongly recommended — yarn weight, hook size, and personal tension all affect the finished measurements significantly.
Choosing Your Colors
One of the most enjoyable things about this stitch is how differently it reads depending on the colors you choose.
Working in a single solid color creates a quietly beautiful fabric where the puff texture is the star and the ripple provides the movement beneath it. A tonal or heathered yarn in one color is particularly effective because the subtle color variation highlights the three-dimensional quality of the puff stitches without the distraction of strong color contrast.
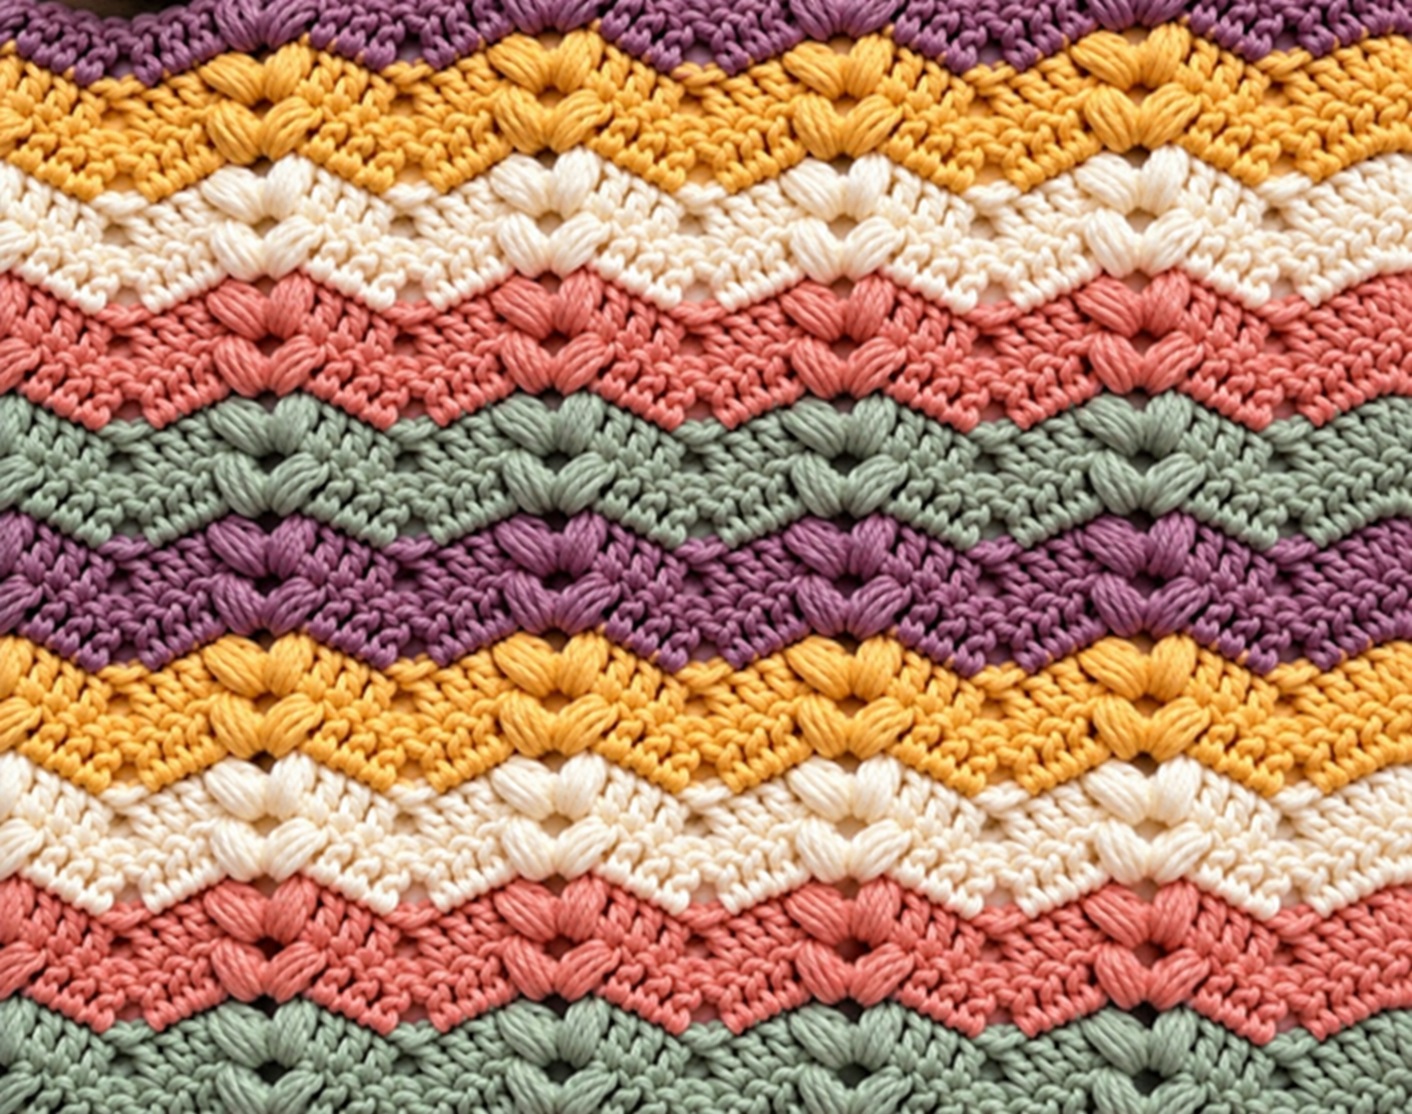
For something more colorful, alternating two or three shades produces beautiful results. Changing colors every two to four rows gives the ripple enough space to read clearly while still making the color stripes a noticeable feature. Changing every single row creates a tight, energetic stripe that works especially well for baby blankets and cheerful accessories.
Soft neutrals give the finished piece a calm, classic appearance. Bright, contrasting colors make the waves feel playful and bold. Both approaches are equally valid — the stitch supports whatever mood you are working toward.
Materials
Medium or worsted weight yarn in your chosen color or colors. A smooth yarn with good stitch definition will show the ripple and puff texture most clearly. Avoid anything too fuzzy or loosely spun — the dimensional quality of the puff stitches can disappear into a halo yarn.
A 5.0 mm crochet hook, or the size appropriate for your chosen yarn. You will also need scissors, a yarn needle for weaving in ends, and stitch markers — optional but genuinely helpful for keeping track of edge stitches through the ripple repeat.
Abbreviations
ch — chain
dc — double crochet
st/sts — stitch/stitches
sp — space
Puff St — puff stitch
rep — repeat
FO — fasten off
How to Work the Puff Stitch
The puff stitch in this pattern is always worked into a chain-2 space rather than directly into a stitch. Understanding this detail before you begin will save you significant confusion once the pattern is underway.
To work a puff stitch: yarn over and insert your hook into the indicated chain-2 space, yarn over and pull up a loop — you now have 3 loops on your hook. Repeat the following three more times: yarn over, insert your hook into the same space, yarn over and pull up a loop. After the fourth insertion you should have 9 loops on your hook. Yarn over and pull through all 9 loops. Chain 1 to close the puff.
That closing chain-1 is part of the puff stitch itself and does not count as a separate stitch.
The most important puff stitch tip: Pull each loop up to approximately the height of your double crochet stitches as you work. Loops that are too short make pulling the hook through all nine loops difficult and frustrating. Keeping the loops loose and consistent makes the puff much easier to form and gives the finished stitch a rounder, more even shape.
Starting Chain
The pattern is worked over a multiple of 12 plus 3 chains. The extra 3 chains serve as the turning chain at the beginning of Row 1.
For a practice swatch, chain 51 — that gives you 48 plus 3 chains and creates enough width to see several complete ripple sections clearly.
Sizing chart for larger projects:
| Ripple Repeats | Starting Chain |
|---|---|
| 4 repeats | 51 chains |
| 5 repeats | 63 chains |
| 6 repeats | 75 chains |
| 8 repeats | 99 chains |
| 10 repeats | 123 chains |
Always make a tension swatch before beginning a blanket or large project. The same starting chain can produce noticeably different measurements depending on the yarn and hook you use.
Important Notes Before You Begin
The turning chain in Row 1 counts as a double crochet. From Row 2 onward, the chain-1 turning chain does not count as a stitch and should not be worked into.
The chain-2 spaces form the tops of the ripple peaks and are where the puff stitches are made.
From Row 3 onward, do not crochet into the puff stitches from the previous row. Those puff stitches are decorative. Each new puff pair is worked into the chain-2 space between the previous pair. Keeping this detail firmly in mind will prevent your stitch count from gradually increasing as you work.
The Pattern
Row 1 — Foundation Ripple Row
Chain a multiple of 12 plus 3. For the sample swatch, chain 51.
Work 1 dc in the 4th chain from the hook. The three skipped chains count as your first double crochet. Work 1 dc in each of the next 4 chains.
Now repeat the following sequence across the row: skip the next 2 chains, work 1 dc in each of the next 5 chains, chain 2, work 1 dc in each of the next 5 chains.
When 7 chains remain: skip the next 2 chains, work 1 dc in each of the next 3 chains, work 2 dc in the next chain, work 1 dc in the final chain. Turn.
After Row 1 you should already be able to see the beginning of the ripple shape. The skipped chains create the valleys and the chain-2 spaces mark the peaks. There are no puff stitches yet — those begin in the next row.
Row 2 — Adding the First Puff Stitches
Chain 1 — this does not count as a stitch.
Work 1 dc in the first dc, 2 dc in the next dc, 1 dc in each of the next 3 dc.
Now repeat across: skip the next 2 dc, work 1 dc in each of the next 4 dc, work Puff St in the next chain-2 space, chain 2, work Puff St in the same space, work 1 dc in each of the next 4 dc.
When 7 structural stitches remain: skip the next 2 dc, work 1 dc in each of the next 3 dc, work 2 dc in the next dc, work 1 dc in the top of the beginning turning chain from Row 1. Turn.
After Row 2 you should be able to see the first puff details sitting along the tops of the waves.
Row 3 — Establishing the Full Puff Ripple
Chain 1 — does not count as a stitch.
Work 1 dc in the first stitch, 2 dc in the next stitch, 1 dc in each of the next 3 dc.
Now repeat across: skip the next 2 dc, work 1 dc in each of the next 4 dc. When you reach the first puff stitch from the previous row, skip it and its closing chain-1. Find the chain-2 space between the two puff stitches and work Puff St, chain 2, Puff St into that space. Skip the second puff stitch and its closing chain-1. Work 1 dc in each of the next 4 dc.
At the end of the row: skip the next 2 dc, work 1 dc in each of the next 3 dc, work 2 dc in the next dc, work 1 dc in the final stitch. Turn.
Row 4 and Every Row After
Repeat Row 3 for the full length of your project. The puff stitches will stack above one another as you work, creating attractive vertical columns of texture running along every ripple peak.
How to Tell If You Are Following the Pattern Correctly
After several rows, the design should show three clear features. The valleys — regular points where two double crochets are skipped. The peaks — each containing a central chain-2 space. And the puff pairs — two puff stitches sitting on either side of each chain-2 space, lining up vertically as the rows build.
If the puff stitches start drifting sideways rather than stacking in clean columns, check the previous row. The most likely cause is accidentally crocheting into a previous puff stitch instead of skipping it and working into the chain-2 space between the pair.
Troubleshooting Common Problems
If your fabric is getting narrower: Check whether you accidentally skipped the first stitch after turning, forgot one of the 2-dc increases near the edge, skipped more than 2 dc at a valley, or left out one of the 4-dc sections beside a peak. Compare your current row against the previous complete row before continuing — with ripple patterns, losing a single stitch can affect the shape noticeably after several rows.
If your fabric is getting wider: The most likely cause is working into the previous puff stitches instead of skipping them. Remember that from Row 3 onward the old puff stitches are not structural stitches. Skip them and work the new puff pair into the chain-2 space between them.
If your ripple looks too flat: The ripple becomes much more dramatic after several rows. If it still looks unusually flat after five or six rows, check that you are consistently skipping 2 dc at every valley, working the required increases near the edges, and maintaining the correct number of double crochet stitches in each section. Very tight tension can also reduce the wave depth — try loosening your tension slightly or moving up half a hook size.
If your puff stitches are too tight or difficult to close: Pull each loop slightly higher when drawing up the loops during the puff stitch. Keeping the loops loose and consistent gives you enough space to pull the hook through all nine loops comfortably. If the problem persists, try a slightly larger hook or consciously relax your tension during the puff stitch only.
Color Changes
For a clean color change, work the final double crochet of the row with your current color up to the final yarn over — two loops remaining on your hook. Use the new color to complete that final yarn over and pull through. Turn and continue with the new shade. This method produces a clean, sharp color transition with no jog at the stripe edge.
Keeping Your Edges Straight
Place a stitch marker in the first and last actual stitch of each row. This simple habit makes it immediately clear where each row begins and ends and prevents the gradual narrowing or widening that can happen when edge stitches are miscounted. Remember that after Row 1 the chain-1 turning chain does not count as a stitch and should not be worked into or counted at the end of a row.
Does This Stitch Need a Border
Not necessarily. One of the natural advantages of a ripple pattern is that the top and bottom edges already have visual character from the wave shaping. The natural wavy edge can be left as is for a relaxed, organic finish.
If you prefer a more structured appearance, a simple round of single crochet worked evenly around the sides of the blanket tidies the edges without competing with the ripple texture. For a larger blanket, block the piece lightly before adding the border to help the fabric lie flat and make working around the edges easier.
Finishing
When the final row is complete, fasten off and cut the yarn leaving a comfortable tail for weaving. Thread the tail onto a yarn needle and weave it securely through the back of the fabric in two directions before trimming. Repeat with all remaining yarn ends.
Smooth the fabric gently with your hands and arrange the peaks and valleys into their natural positions. If your yarn allows blocking, a light steam block or a mist and pat with water will relax the stitches, deepen the wave definition, and give the finished piece a noticeably more polished appearance.
A Simple Way to Remember the Repeat
If you are still in the early stages of learning this stitch, try thinking of each row as a simple repeating sequence rather than a list of individual instructions. The heart of every row is: valley — double crochet section — puff peak — double crochet section — valley. Once you can see those five sections in the fabric in front of you, you will find that the work itself starts telling you where the next part of the pattern belongs.
Final Thoughts
The Puff Ripple Stitch is one of those rare patterns that looks significantly more impressive than the effort required to produce it. The ripple gives the fabric its movement and rhythm. The puff stitches give it dimension and personality. Together they create something that looks carefully designed and beautifully made — because it is.
If the first few rows feel uncertain, keep going. Ripple stitches almost always look better after several repeats than they do in the early rows, and the puff placement becomes intuitive more quickly than you might expect.
Most importantly, enjoy the process. Choose colors that make you happy to pick up the hook. Make a small swatch before a large project. And then settle in and watch the waves build.