A soft blue background, rolling wave chevrons, and tiny red sailboats that look like they are actually floating — this is the blanket that makes everyone in the room stop and look.
The Blanket That Tells a Story
Some blankets are beautiful. Some blankets are useful. Every now and then you come across one that is both of those things and also tells a little story — and those are the ones that get kept for years, pulled out of storage decades later, and handed down to the next generation.
The Bobbing Boats Blanket is that kind of project.
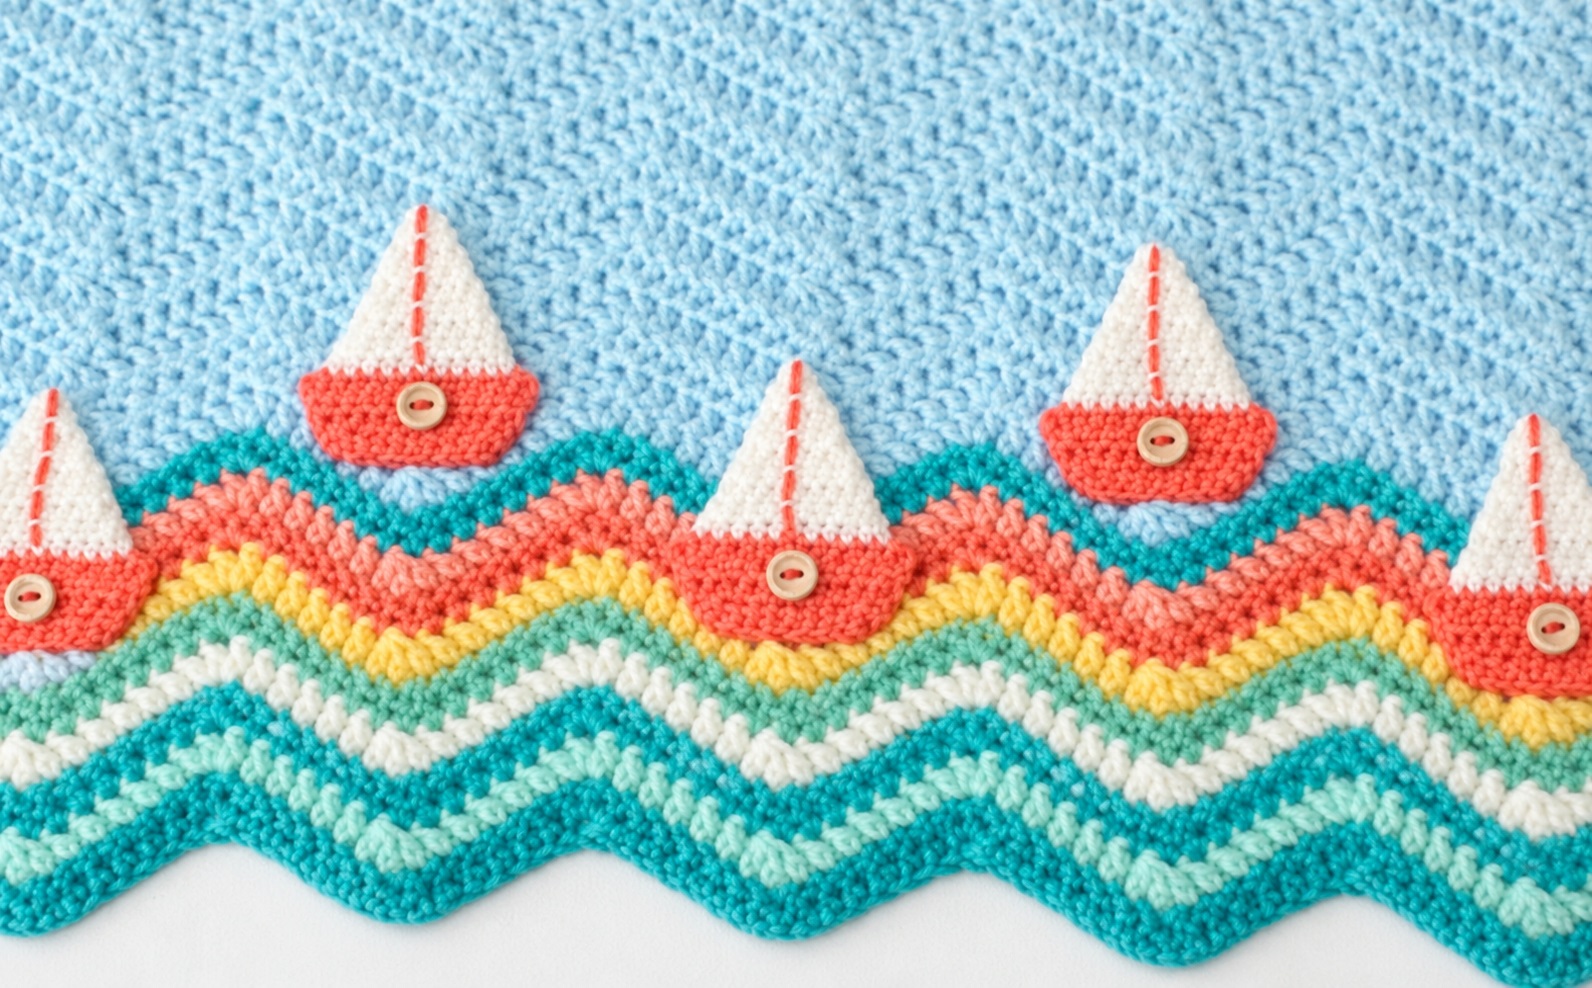
The soft light blue background reads like a clear summer sky. The alternating dark and pale blue chevron section rolls across the lower edge like actual ocean waves. And sitting right on top of those waves, tiny red and white sailboats bob across the surface as if they are actually moving. Together, the three elements create a complete nautical scene that looks like something you would find in a boutique children’s shop — not crocheted on your sofa on a Tuesday evening.
It is a beautiful baby shower gift, a nursery statement piece, or simply a project you make because you love the sea and you want to bring a little of that feeling into your home.
What Makes This Blanket Special
Most appliqué blankets ask you to choose between a beautiful background and interesting details. This one delivers both without either element competing with the other.
The main blanket body is worked in soft light blue — a calm, uncluttered background that lets the wave section and the boats do their visual work without any noise behind them. The chevron wave section introduces shaping through increases and decreases, which sounds technical but becomes wonderfully rhythmic once the repeat is established. And the sailboat appliqués are made separately and sewn on at the end, which means you can arrange and rearrange them across the waves until the placement feels exactly right before committing to a single stitch.
It is a clever construction. Each element is simple on its own. Together they create something that looks genuinely complex.
Skill Level
This blanket is well suited to confident beginners and intermediate crocheters. The main body gives you good practice maintaining even tension across a larger piece. The wave section introduces shaping in a straightforward, repetitive way that becomes intuitive quickly. And the appliqués add a separate construction technique that is satisfying to learn and easy to apply to future projects.
Techniques used throughout this pattern include chain stitches, single crochet, half double crochet, double crochet, increases and decreases for the wave shaping, color changes, appliqué construction, and basic sewing for attaching the finished boats.
Materials
Worsted weight yarn in four colors works best for this project and gives the finished blanket the color definition and body it needs to read clearly from a distance.
The traditional nautical palette — light blue for the main background, dark navy for the wave definition, crisp white for the sails, and bright red for the hulls — gives the blanket its classic seaside character. But the color combination is one of the most enjoyable things to personalize in this pattern.
For a softer nursery version, dusty blue, ivory, muted navy, and burgundy create a quieter, more vintage feel. For something more contemporary, seafoam green, cream, charcoal, and coral give the same nautical theme a modern coastal update. For a brighter children’s blanket, turquoise, royal blue, yellow, and red create a bold, cheerful maritime scene that works beautifully in a playroom or toddler bedroom.
Whatever combination you choose, keeping strong contrast between the wave colors is important. The chevron pattern reads most clearly when the alternating rows are noticeably different from each other — a pale and a dark shade rather than two mid-tones sitting too close together.
You will also need a crochet hook appropriate for your yarn weight, a yarn needle for weaving ends and sewing appliqués, scissors, and stitch markers to help track increases and decreases through the wave section.
The Main Blanket Body
The blanket body is worked in the main light blue color using a simple, consistent stitch pattern that creates a softly textured background. This section is deliberately straightforward — it is the canvas the waves and boats will sit against, and its job is to be beautiful without being distracting.
Work to your desired blanket width and continue until the body reaches the point where the wave section begins. Use stitch markers at regular intervals to help maintain even tension across the full width, particularly if you are working on a larger blanket where the row length is significant.
The Wave Section
The wave section is the most visually striking part of the blanket and the element that gives the whole design its movement and energy. Alternating rows of dark navy and pale blue create the strong definition between each row of chevrons, allowing the zigzag peaks and valleys to stand out clearly against each other.
The wave pattern is created through a repeating sequence of increases and decreases — stitches worked together at the valley points and extra stitches added at the peak points. This shaping is what produces the characteristic wave profile, and consistent stitch counts through every row are what keep the peaks evenly spaced and the waves looking clean and regular.
The most important habit to build through the wave section is counting your stitches at the end of every row, at least until the repeat feels completely familiar. Each increase and decrease is structural — a missed decrease or an extra increase will shift the alignment of every wave in the rows that follow. Once the repeat is memorized and your hands know where each stitch belongs, the wave section becomes one of the most relaxing parts of the project.
Work the wave section in as many rows as the pattern specifies, alternating between the two blue shades consistently throughout.
The Sailboat Appliqués
The sailboats are what transform an attractive nautical blanket into something genuinely memorable. Each small boat features a bright red hull and a crisp white sail with a narrow red vertical detail running through the center — a detail that adds definition to the sail and ties the hull and sail colors together beautifully.
Each boat is made as a separate piece and sewn onto the finished blanket after the main body and wave section are complete. Working the boats separately gives you complete control over placement before anything is permanently attached — a significant advantage for a design where the spacing and arrangement of the boats across the waves makes a real difference to the finished appearance.
When all your boats are made and ready, lay them across the wave section of the blanket before picking up your needle. Experiment with the spacing — some crocheters prefer evenly spaced boats at regular intervals, while others like a slightly more scattered, organic arrangement that looks more like an actual sailing scene. Step back from the blanket or take a photograph to check the overall balance before sewing. A photograph often reveals spacing issues that are easy to miss when you are standing directly over the work.
Once you are satisfied with the arrangement, sew each boat securely to the blanket using matching yarn and a tapestry needle. Work several stitches through each piece and finish with the yarn tail woven in securely on the wrong side.
DOWNLOAD ⛵ Bobbing Boats Blanket Crochet Pattern
Finishing
Weave in all yarn ends carefully, running each tail through several stitches in two directions before trimming. A light block will help even out the wave section and give the edges of the blanket a cleaner, more defined shape. For acrylic yarn, a gentle steam block or a press under a damp cloth works well. For natural fiber yarn, wet blocking will give the most defined result.
Check that all boat appliqués are firmly attached before the blanket goes into use, particularly if it is intended for a young child. Reinforce any appliqué that feels loose with a few additional stitches through the base.
Final Thoughts
The Bobbing Boats Blanket is the kind of project that earns its place in a child’s life long after the making is forgotten. The soft background, the rolling waves, the little boats bobbing across the surface — it is a complete scene, and there is something genuinely special about a handmade object that tells a story rather than simply covering someone up.
Make it for a baby shower and watch the recipient’s face when they unfold it. Make it for a nursery and see how it looks on the wall before it goes on the crib. Make it because you love the sea and you wanted to spend a few evenings in good company with your hook and a palette of blues.
Whatever the reason, this is a blanket worth making.